Nextcloud has recently introduced the Nextcloud Assistant, a tool that defines a centralized entry point for the user to make use of Artificial Intelligence (AI) features in the platform.
This article gives an overview of this tool and provides high-level steps to get it working, using a LocalAI service.
Setup overview
At a high-level, the setup is a four-phases process:
- Setup the LocalAI service
- Setup the Nextcloud Assistant
- Configure the Artificial Intelligence section
- Try and test it
Software environment
This is the local software environment that we have used:
- Nextcloud server:
29.0.0 - LocalAI:
2.15.0 - Nextcloud Assistant:
1.0.9 - Operating system:
Ubuntu Server 22.04.4 LTS
Concepts
Let’s introduce a few important concepts before starting the setup procedure.
AI Provider
You need an Artificial Intelligence (AI) Provider to make use of AI features in your Nextcloud instance via the Nextcloud Assistant. At the moment the AI providers compatible with Nextcloud Assistant are
- OpenAI, a cloud service operated by the US-based company Open AI
- LocalAI, a free and open-source service that can be deployed on premise, described in the project home page as “a drop-in replacement REST API that’s compatible with OpenAI API specifications for local inferencing”
This article focuses on how to setup the Nextcloud Assistant with a LocalAI service.
Connected Accounts
Generally speaking, when you integrate an external service into Nextcloud, such as Mastodon, Github or Jira, you will need to install the app and configure its connection and authentication in the Connected Accounts settings.
The integration has to be enabled and configured globally (that is, instance-wide) by the administrator, and, depending on the type of integration, the user will be able to customize some aspects for his/her own use.
Nextcloud Assistant is handled as a Connected Account as it is, at its core, a bridge that allows your Nextcloud instance to “speak” with an AI provider.
AI Capability
AI capabilities are the task categories that the AI provider can help you with. The capabilities that are currently exposed in the Nextcloud Assistant are the following ones:
- Machine translation
- Speech-to-text (transcription)
- Image generation
- Text processing (free prompt, summarize, generate headline and reformulate)
Setup the LocalAI service
There are different options to deploy the LocalAI service. Check the Project Quickstart page for more details. In this article we are using the method referred to as “From binary” in that page.
Download the binary from the releases page, in our case it is local-ai-Linux-x86_64, and put it in a proper folder, for example /opt/local-ai/.
NOTE: If you want to generate images, you will need to compile the local-ai binary by your-self. From our testing, it doesn’t seem a trivial task.
In our case, we are also renaming it local-ai, to make our code listings cleaner.
Create a systemd service for local-ai, called local-ai:
$ vim /etc/systemd/system/local-ai.service
[Unit]
Description = Service for LocalAI, the free, Open Source OpenAI alternative
Documentation = https://localai.io/

[Service]
EnvironmentFile = /etc/local-ai/local-ai.env
ExecStart = /opt/local-ai/local-ai run

[Install]
WantedBy = multi-user.target
Create a file for environment variables related to the service:
$ vim /etc/local-ai/local-ai.env
LOCALAI_MODELS_PATH=/etc/local-ai/models
LOCALAI_API_KEY=your-api-key
NOTE: Setting the parameter LOCALAI_API_KEY is recommended for enhanced security , however you may not be able to access the web UI from a browser if setting it (see #2227). If you need access to the web UI, for example because you need to download some models, just comment it and restart the service.
Create a folder for the models:
$ mkdir /etc/local-ai/models
Then run:
$ systemctl daemon-reload
$ systemctl enable locali
$ systemctl start local-ai
And check that the service is running:
$ systemctl status local-ai
The next step is to connect to the web UI and download some models. If you didn’t change the port, the web UI is available on localhost:8080. You will be able to access the model gallery by clicking on Models in the top menu.

In our case we have downloaded the model called llava-1.6-vicuna (home page: https://llava-vl.github.io/). In general, it is important to check the size of a model, but it is not trivial to know it upfront. So, it is a good idea to place the models in a dedicated partition and monitor its used capacity. For example, this specific model weights around 5G on disk.

The point on models requirements in terms of hardware resources consumption is not limited to storage. As the first inference request comes in, the model is loaded in memory and all the threads available on the system are used to perform the operation. You may want to fine-tune the number of threads to find the right balance between performance and system stability. But, in general, it makes sense to have a dedicated system for this service.
Setup the Nextcloud Assistant
Go to the App Store and search for “assistant”. Select the Nextcloud Assistant app and enable it. Once enabled, refresh the page and you should see the app icon available in the right part of the top bar, just left to the Search icon.

settings/admin/connected-accounts) and select the account for “OpenAI and LocalAI integration". Then fill in the Service URL and the Service name (optional, but recommended).
Remember that, if you passed a value to the parameter LOCALAI_API_KEY in the LocalAI environment file, then you need to put the same value in field API key, section Authentication. If you didn’t, then, you can leave it empty.
Options under Usage limits are not applicable for LocalAI, as LocalAI doesn’t support them at the moment. This is fine as the service is meant to be local and under your control but we hope that these features will be available in the future for LocalAI.
The AI model can be configured by selecting the text completion endpoint, the default model to use and whether you want to pass additional parameters. If the default model doesn't have the capability required to perform the task, the system will select another one that is available and has the capability. If no model is available for that capability, tasks of this type will fail. As a UI enhancement, it would be great to have the possibility to select the default model by capability, similiar to what is done in the Artificial Intelligence section.
The model to use is shown here only if a successful connection to the Service URL can be established, so you should make sure that your LocalAI service is up and running when you configure these settings.
Finally, you can also select which AI capabilities the service should be used on.
Configure Artificial Intelligence Section
For each capability you’ll need to specify the provider. To complete this task go to section settings/admin/ai. What you’ll see here depends on whether you have other providers for one or more of the capabilities. For example, if you installed and configured the Translate app, and your LocalAI service is also exposing this capability, you’ll need to decide which is the provider of machine translation.
These are the available capabilities:
- Machine translation
- Speech-to-text
- Image generation
- Text processing, further split in tasks: Free prompt, Summarize, Generate headline, Reformulate

By scrolling down to the bottom, you’ll find also some checkboxes related to where you want the Assistant available in the UI: top bar and several options related to the smart picker.
The exposure location that you leave enabled can also be disabled by the user. The user cannot enable a location that you disabled, though.
Try it
From the Top Bar
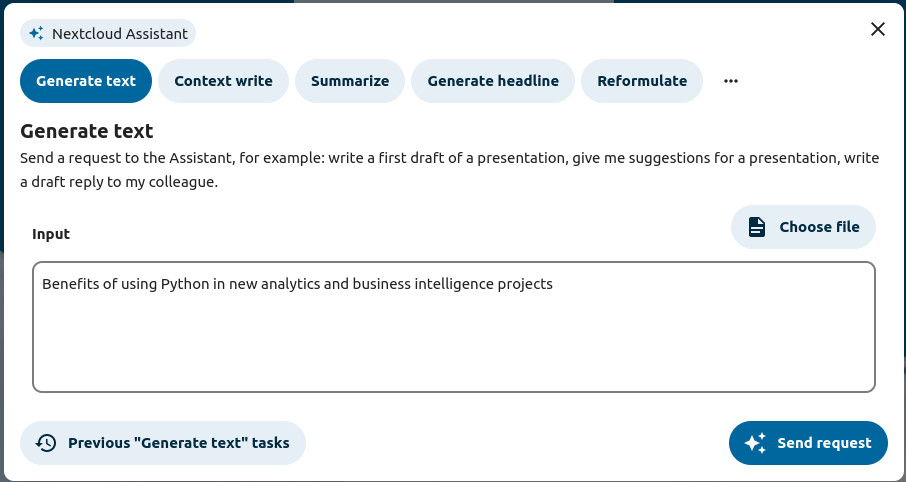
If you followed the instructions so far, you should be now ready to ask the Nextcloud Assistant to run some task for you, starting from invoking it from the top bar.
When clicking on the icon, a pop-up window appears in which you can choose the task (generate text, context write, summarize …) and give the assistant the input to the task. Input can be typed or taken from a document available in the instance.

When starting the task you will be also offered the option to run it in the background.

If you choose this option, your task is inserted in the queue of the background jobs scheduler and you will be notified via the standard Nextcloud notification system when your result is ready. By clicking on the notification, you will be able to retrieve the result and perform other meaningful actions, such as copy the result to the clipboard, repeat the task and review your similar recent interactions with the assistant.

Within Nextcloud Text
The Nextcloud Assistant is also available in Nextcloud Text. You’ll find in the right part of your editing area, with the same options as in the top bar, but with some user actions put in context, such as the possibility to insert the results in the document text.

Moreover the assistant can be evoked as a Smart Picker option, by typing / in the text.

Finally, if you configured the AI provider for machine translation to be the one accessible via your LocalAI service, the translate function will also trigger a request to the model available in that backend, when used.
It is important to mention that Nextcloud Text is not just the default editor to work with Markdown and plain text files, but the editing engine of other key Nextcloud apps such as Nextcloud Deck, Nextcloud Notes and Nextcloud Collectives. With this remark, we’d like to stress out that the same functionalities will be available for these apps without any further configuration.
Within Nextcloud Talk
Nextcloud Assistant is also available in Nextcloud Talk, in two flavours: via the smart picker or as a translation provider.
The Smart Picker can be run by typing /ai: we are offered to either transcribe an audio recording or to generate some text.
If we focus on the audio transcription task here, we are first offered to record or to pick an audio file that we want to be transcribed.

The task is then scheduled and we are notified when the results are ready:

Just to mention a use case, audio transcription is handy when we get a voice message that we cannot play in that very moment (e.g. we are on a train without an headset): we retrieve instead the voice message file, give it to the assistant and read it once the result is ready.
Apart of features available via the Smart Picker, similar to what happens in Text, we can also translate a message via machine translation, by selecting the corresponding option in the three-dots menu of a message.
Conclusion
As Artificial Intelligence becomes more widespread and users expect to have AI-related features available in their web applications, being them used in an enterprise or a private context, it is important to develop an understanding of the options available to deploy those AI-enabling services. The Nextcloud Assistant is probably the most prominent integration that opens a structured way for AI providers to offer their features in a content collaboration environment. This article has focused on the LocalAI provider, that can be deployed on-premises thus giving greater control over compliance and user data management, both of utmost importance for a secure and trustful digital workplace.
Without touching other crucial and complex topics such as AI-based results quality assessment and how the introduction of this technology changes the way users collaborate in the platform, we have hopefully given you a useful hands-on headstart on this integration.
Please contact us for any question or remark related to this article. We can help you in the deployment of basic and advanced services related to the Nextcloud platform